When I first transitioned my personal blog, kheai.com, to a modern static tech stack using Astro (specifically the excellent Astro-Paper theme), I felt like I had unlocked a web development superpower. The site was blazing fast, perfectly optimized, and completely version-controlled via my GitHub repository, kafechew/ilearn.
But it didn’t take long to hit a major roadblock that every static site generator (SSG) developer eventually faces: How do you schedule future posts?
If you come from the WordPress world, you are used to writing a post, setting a date for next Tuesday, hitting “Schedule,” and walking away. With a static site, that doesn’t work out of the box. Because your site is built into static HTML/JSON files at a specific moment in time, it has no database or running server to check if “tomorrow” has arrived.
Previously, I experimented with a decentralized content pipeline using Nostr and Astro to rethink how data flows into my site. But I needed a reliable, dead-simple way to solve the day-to-day scheduling problem.
Today, I’m going to show you exactly how I engineered a zero-cost, fully automated publishing pipeline using Vercel Deploy Hooks and GitHub Actions. By the end of this guide, you’ll be able to push a batch of scheduled articles to your repo, and your blog will automatically publish them daily while you sleep.
The Static Site Paradox (And How We Break It)
Before we jump into the code, let’s understand the underlying problem so you can debug it like a pro later.
When you push code to GitHub, Vercel intercepts that push and runs a command (like astro build). Astro looks at your markdown files, sees an article with a future date, and—thanks to Astro-Paper’s built-in logic—smartly excludes it from the production build. Your future post remains invisible.
The paradox? If you don’t push new code tomorrow, Vercel has no reason to rebuild your site. Your future post will stay invisible forever, even after its scheduled date has passed.
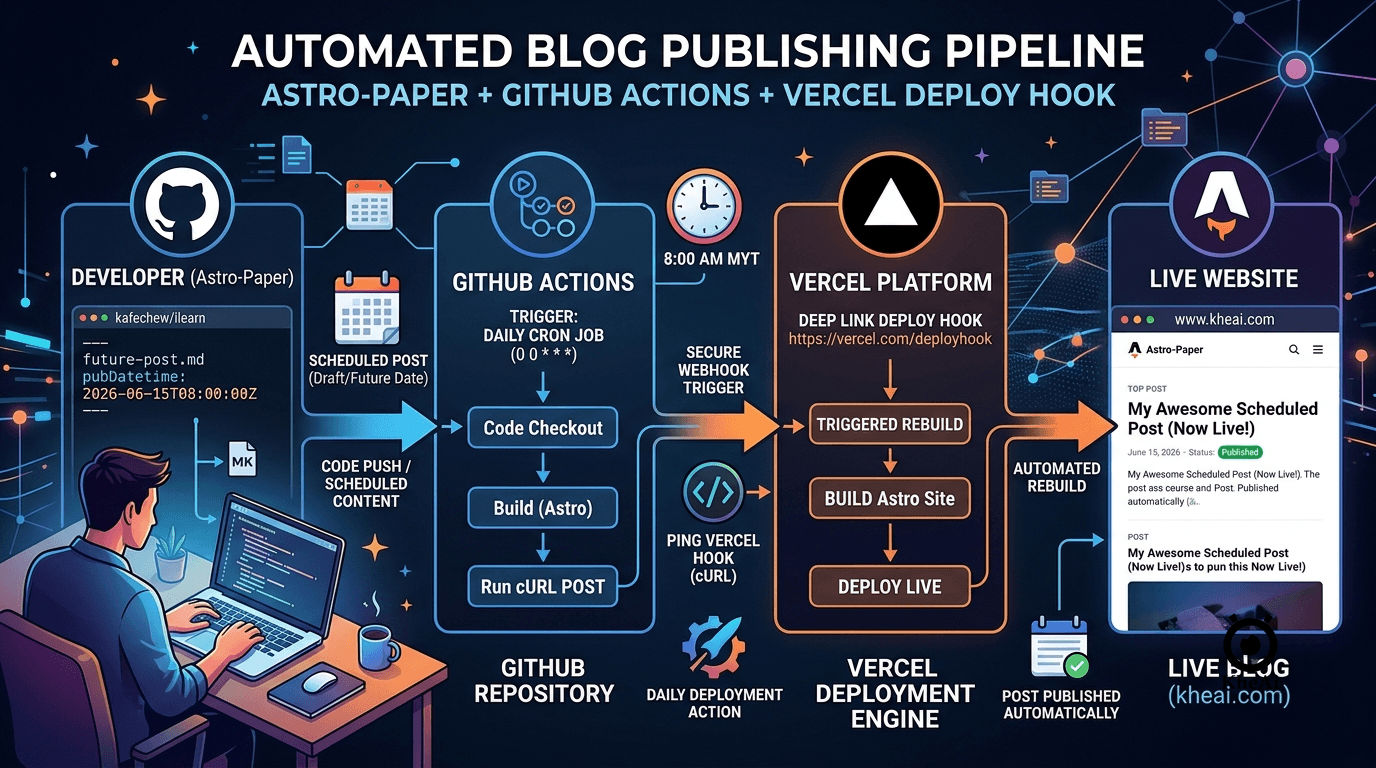
To break this paradox, we don’t need a complex backend or a paid third-party scheduling service. We just need three things:
- A Astro Post with a future timestamp.
- A Secret Door (Vercel Deploy Hook) that triggers a rebuild when knocked on.
- A Reliable Robot (GitHub Actions) that knocks on that door every single morning.
Here is the step-by-step blueprint of how I set this up for my own site.
Step 1: Prepping Your Content in Astro-Paper
First, we need to ensure our content is actually structured for scheduling. Astro-Paper uses a pubDatetime field in its frontmatter to handle publication dates.
When you write a post that you want to schedule for the future, format your markdown or MDX frontmatter like this:
---
title: The Future of My Decentralized Content Pipeline
author: Kheai
pubDatetime: 2026-06-15T08:00:00Z
slug: future-content-pipeline
featured: false
draft: false
tags:
  - webdev
  - astro
description: A deep dive into automating my static blog pipelines.
---
⚠️ Crucial Detail: Notice the
Zat the end of thepubDatetimestring? That stands for Zulu time (UTC). If you live in Malaysia (MYT, which is UTC+8) like me,08:00:00Zmeans the post is scheduled for 4:00 PM local time. Keep track of your time zones when writing content!
Commit this file and push it to your GitHub repository. If you visit your live site, the post won’t be there yet. Astro safely filtered it out.
Step 2: Creating a Vercel Deploy Hook
Now, we need to give GitHub a way to tell Vercel: “Hey, look at the calendar. It’s a new day. Rebuild the site so yesterday’s future posts become today’s live posts.” We do this with a Deploy Hook.
- Go to your Vercel Dashboard and open your project.
- Navigate to Settings > Git from the top and left sidebars.
- Scroll down to the Deploy Hooks section.
- Fill out the form fields:
- Hook Name:
Daily Scheduled Build - Git Branch Name:
main(or whatever your production branch is named).
- Hook Name:
- Click Create.
Vercel will generate a unique, cryptic URL that looks something like this:
https://api.vercel.com/v1/integrations/deploy/prj_xxxxxxXXXXxxxxxxXXXXCopy this URL to your clipboard. Treat this URL like a password. Anyone who has it can force your website to rebuild, which could quickly drain your Vercel build minutes if abused.

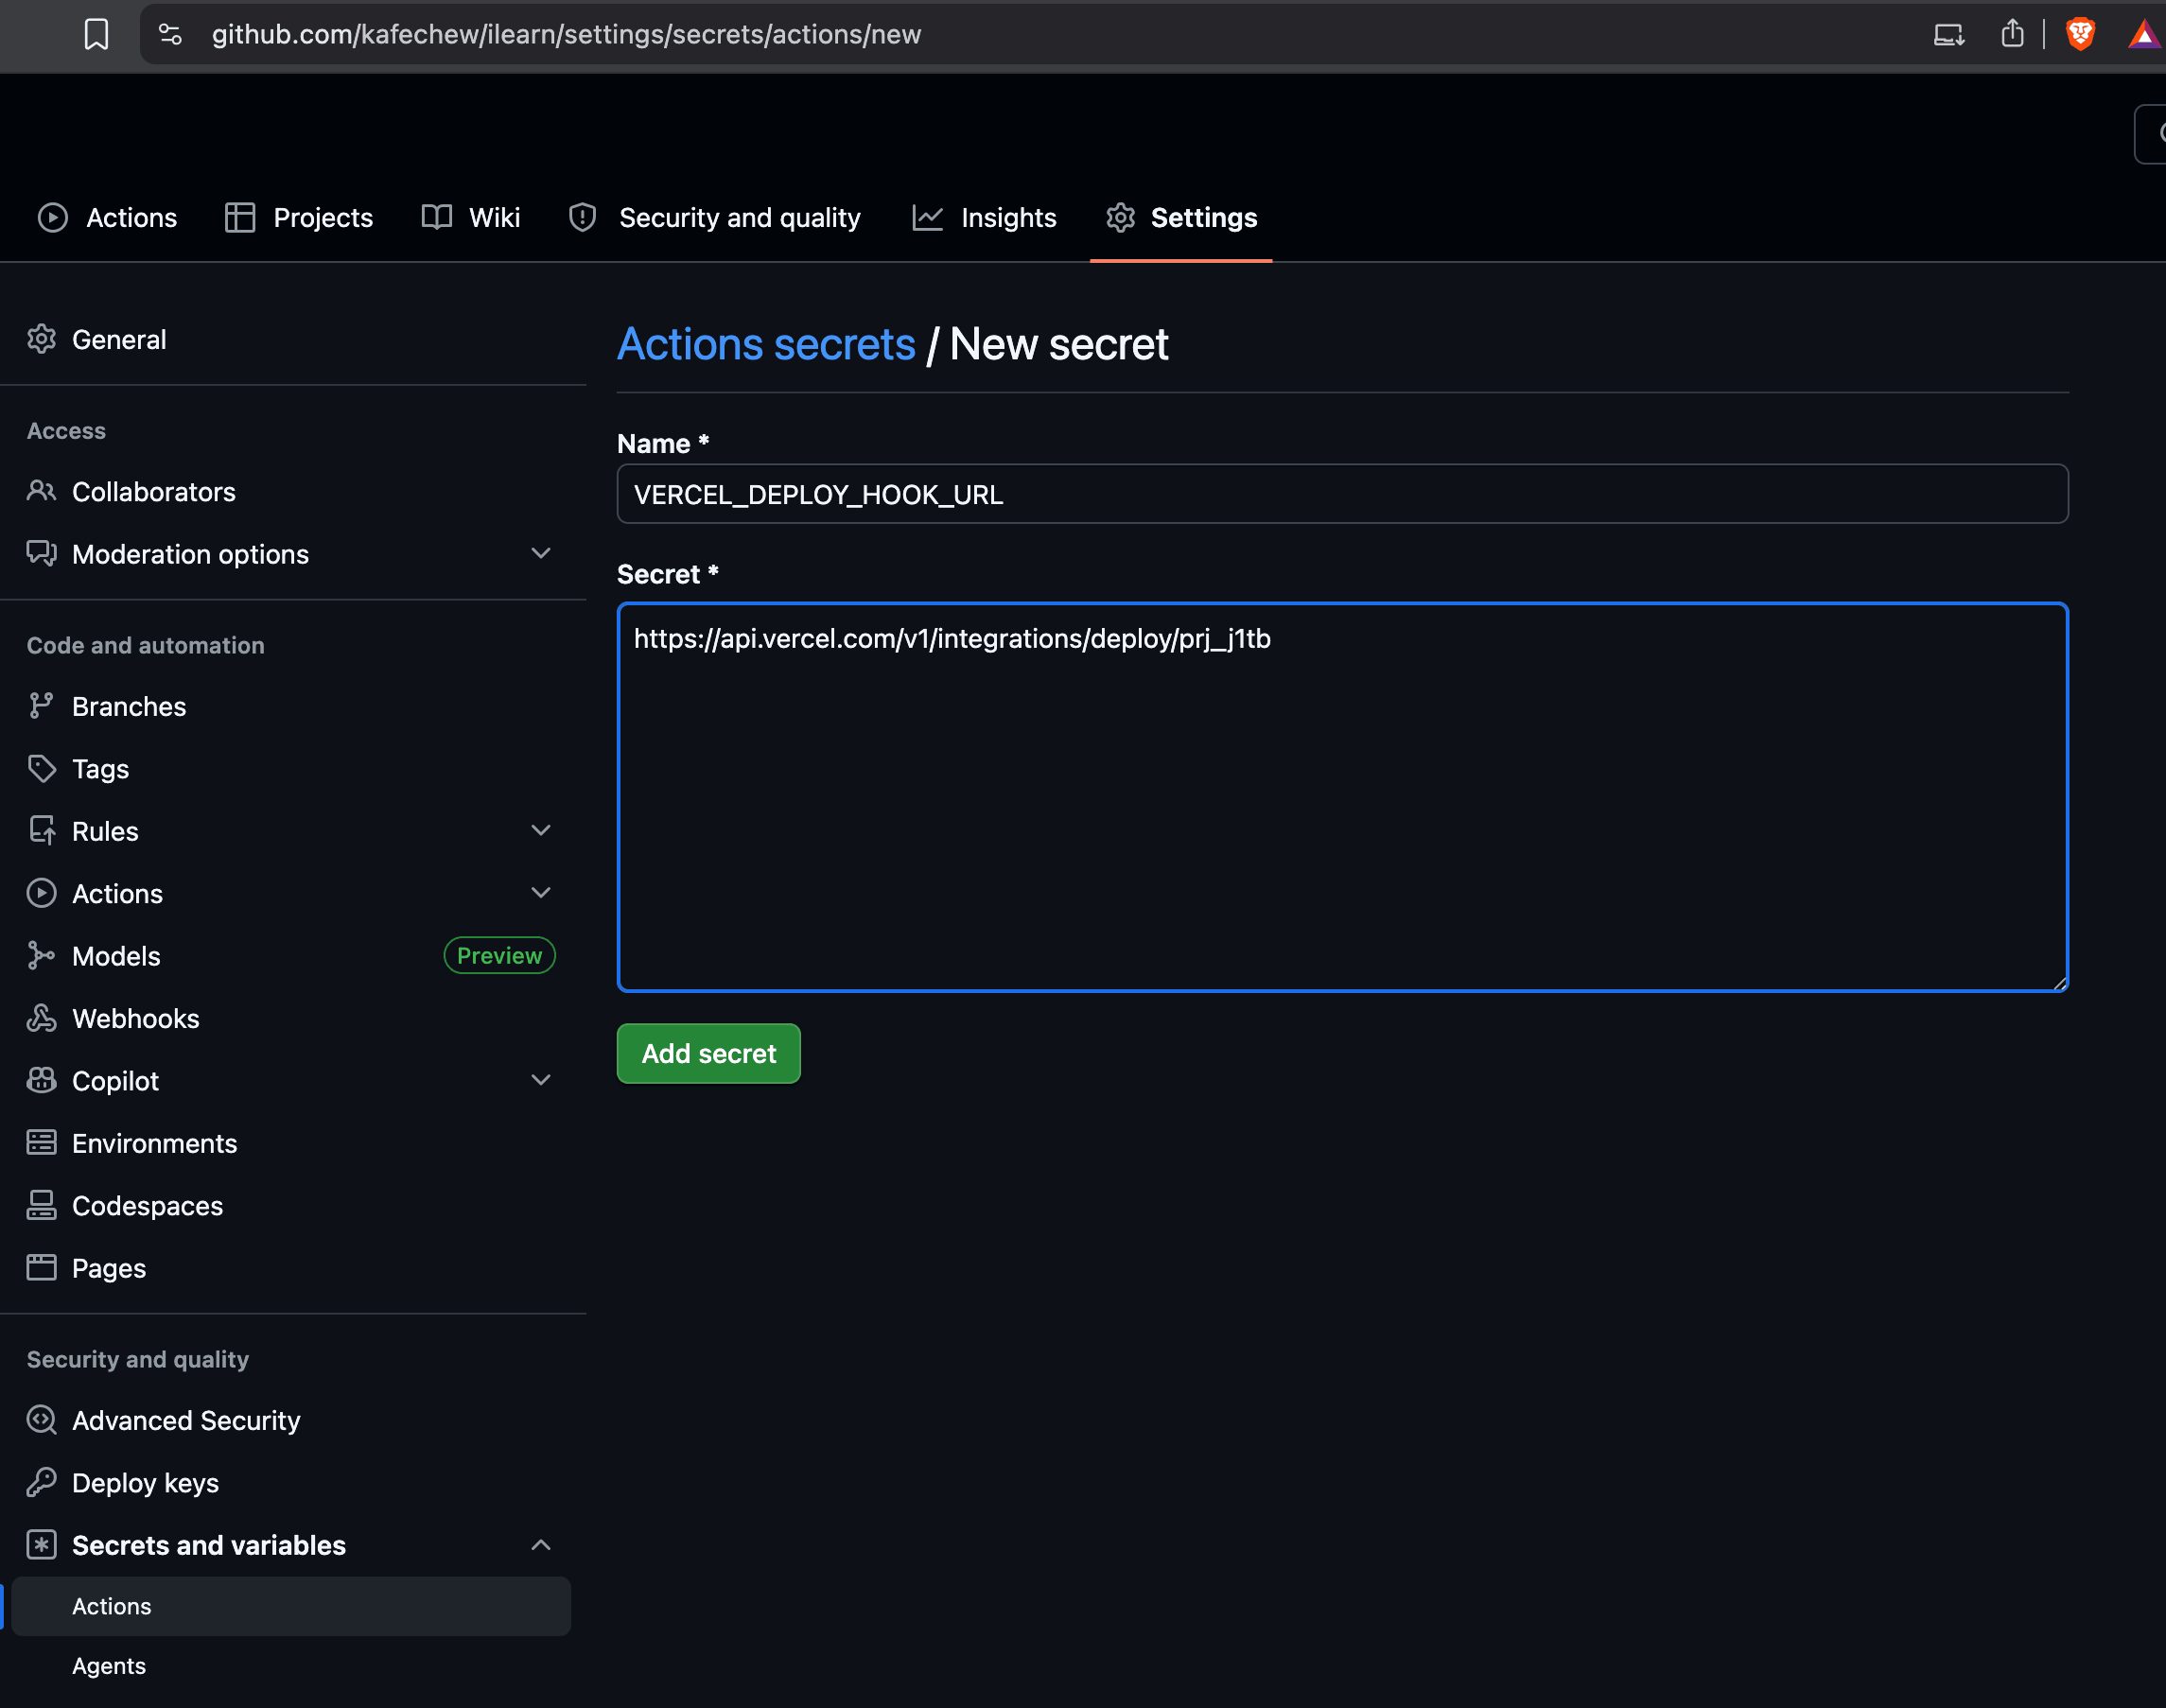
Step 3: Securing Your Webhook in GitHub Secrets
Because that Vercel URL needs to stay private, we cannot just hardcode it into our public GitHub repository. Instead, we will store it securely inside GitHub’s encrypted vault.
- Go to your blog’s GitHub repository (
github.com/kafechew/ilearn). - Click on the Settings tab (the gear icon at the top of the repository page).
- On the left sidebar, scroll down to the Security section, expand Secrets and variables, and click on Actions.
- Click the green New repository secret button in the top right.
- Configure the secret exactly like this:
- Name:
VERCEL_DEPLOY_HOOK_URL - Value: (Paste the entire Vercel URL you copied in Step 2)
- Name:
- Click Add secret.
Now, our automated environment can access this URL safely behind the scenes.
Step 4: Writing the Cron Job Workflow with GitHub Actions
With our secure webhook in place, it’s time to build our automated “robot.” We will write a GitHub Action workflow that uses a cron schedule to trigger our Vercel build automatically.
In your local project directory, create a folder structure at the root level called .github/workflows/. Inside that workflows folder, create a new file named daily-build.yml.
Paste the following configuration into the file:
name: Daily Vercel Build Optimization

on:
  schedule:
    # Triggers at 00:00 UTC every single day.
    # If you are in Malaysia (UTC+8), this triggers exactly at 8:00 AM.
    - cron: '0 0 * * *'

  # This enables a manual "Run Workflow" button in the GitHub UI for easy testing
  workflow_dispatch:

jobs:
  trigger-hook:
    name: Ping Vercel Webhook
    runs-on: ubuntu-latest
    steps:
      - name: Send POST Request to Vercel
        run: |
          curl -X POST "${{ secrets.VERCEL_DEPLOY_HOOK_URL }}"
Deconstructing the Code:
on.schedule.cron: Uses standard UNIX cron syntax.0 0 * * *means minute 0, hour 0, every day, every month, every day of the week.workflow_dispatch: This is a massive life-saver. Without this line, you would have to wait until midnight UTC just to see if your automation works. This line adds a manual override button.curl -X POST: This runs a tiny, instantaneous command-line instruction on a clean Ubuntu server provided by GitHub, sending an empty secure payload to Vercel to wake up the deployment engine.
Save this file, commit it, and push it to your main branch:
git add .github/workflows/daily-build.yml
git commit -m "chore: implement daily automated publishing pipeline"
git push origin main
Step 5: Testing Your New Content Pipeline
Let’s verify everything works seamlessly without waiting for the morning cron schedule to kick in.
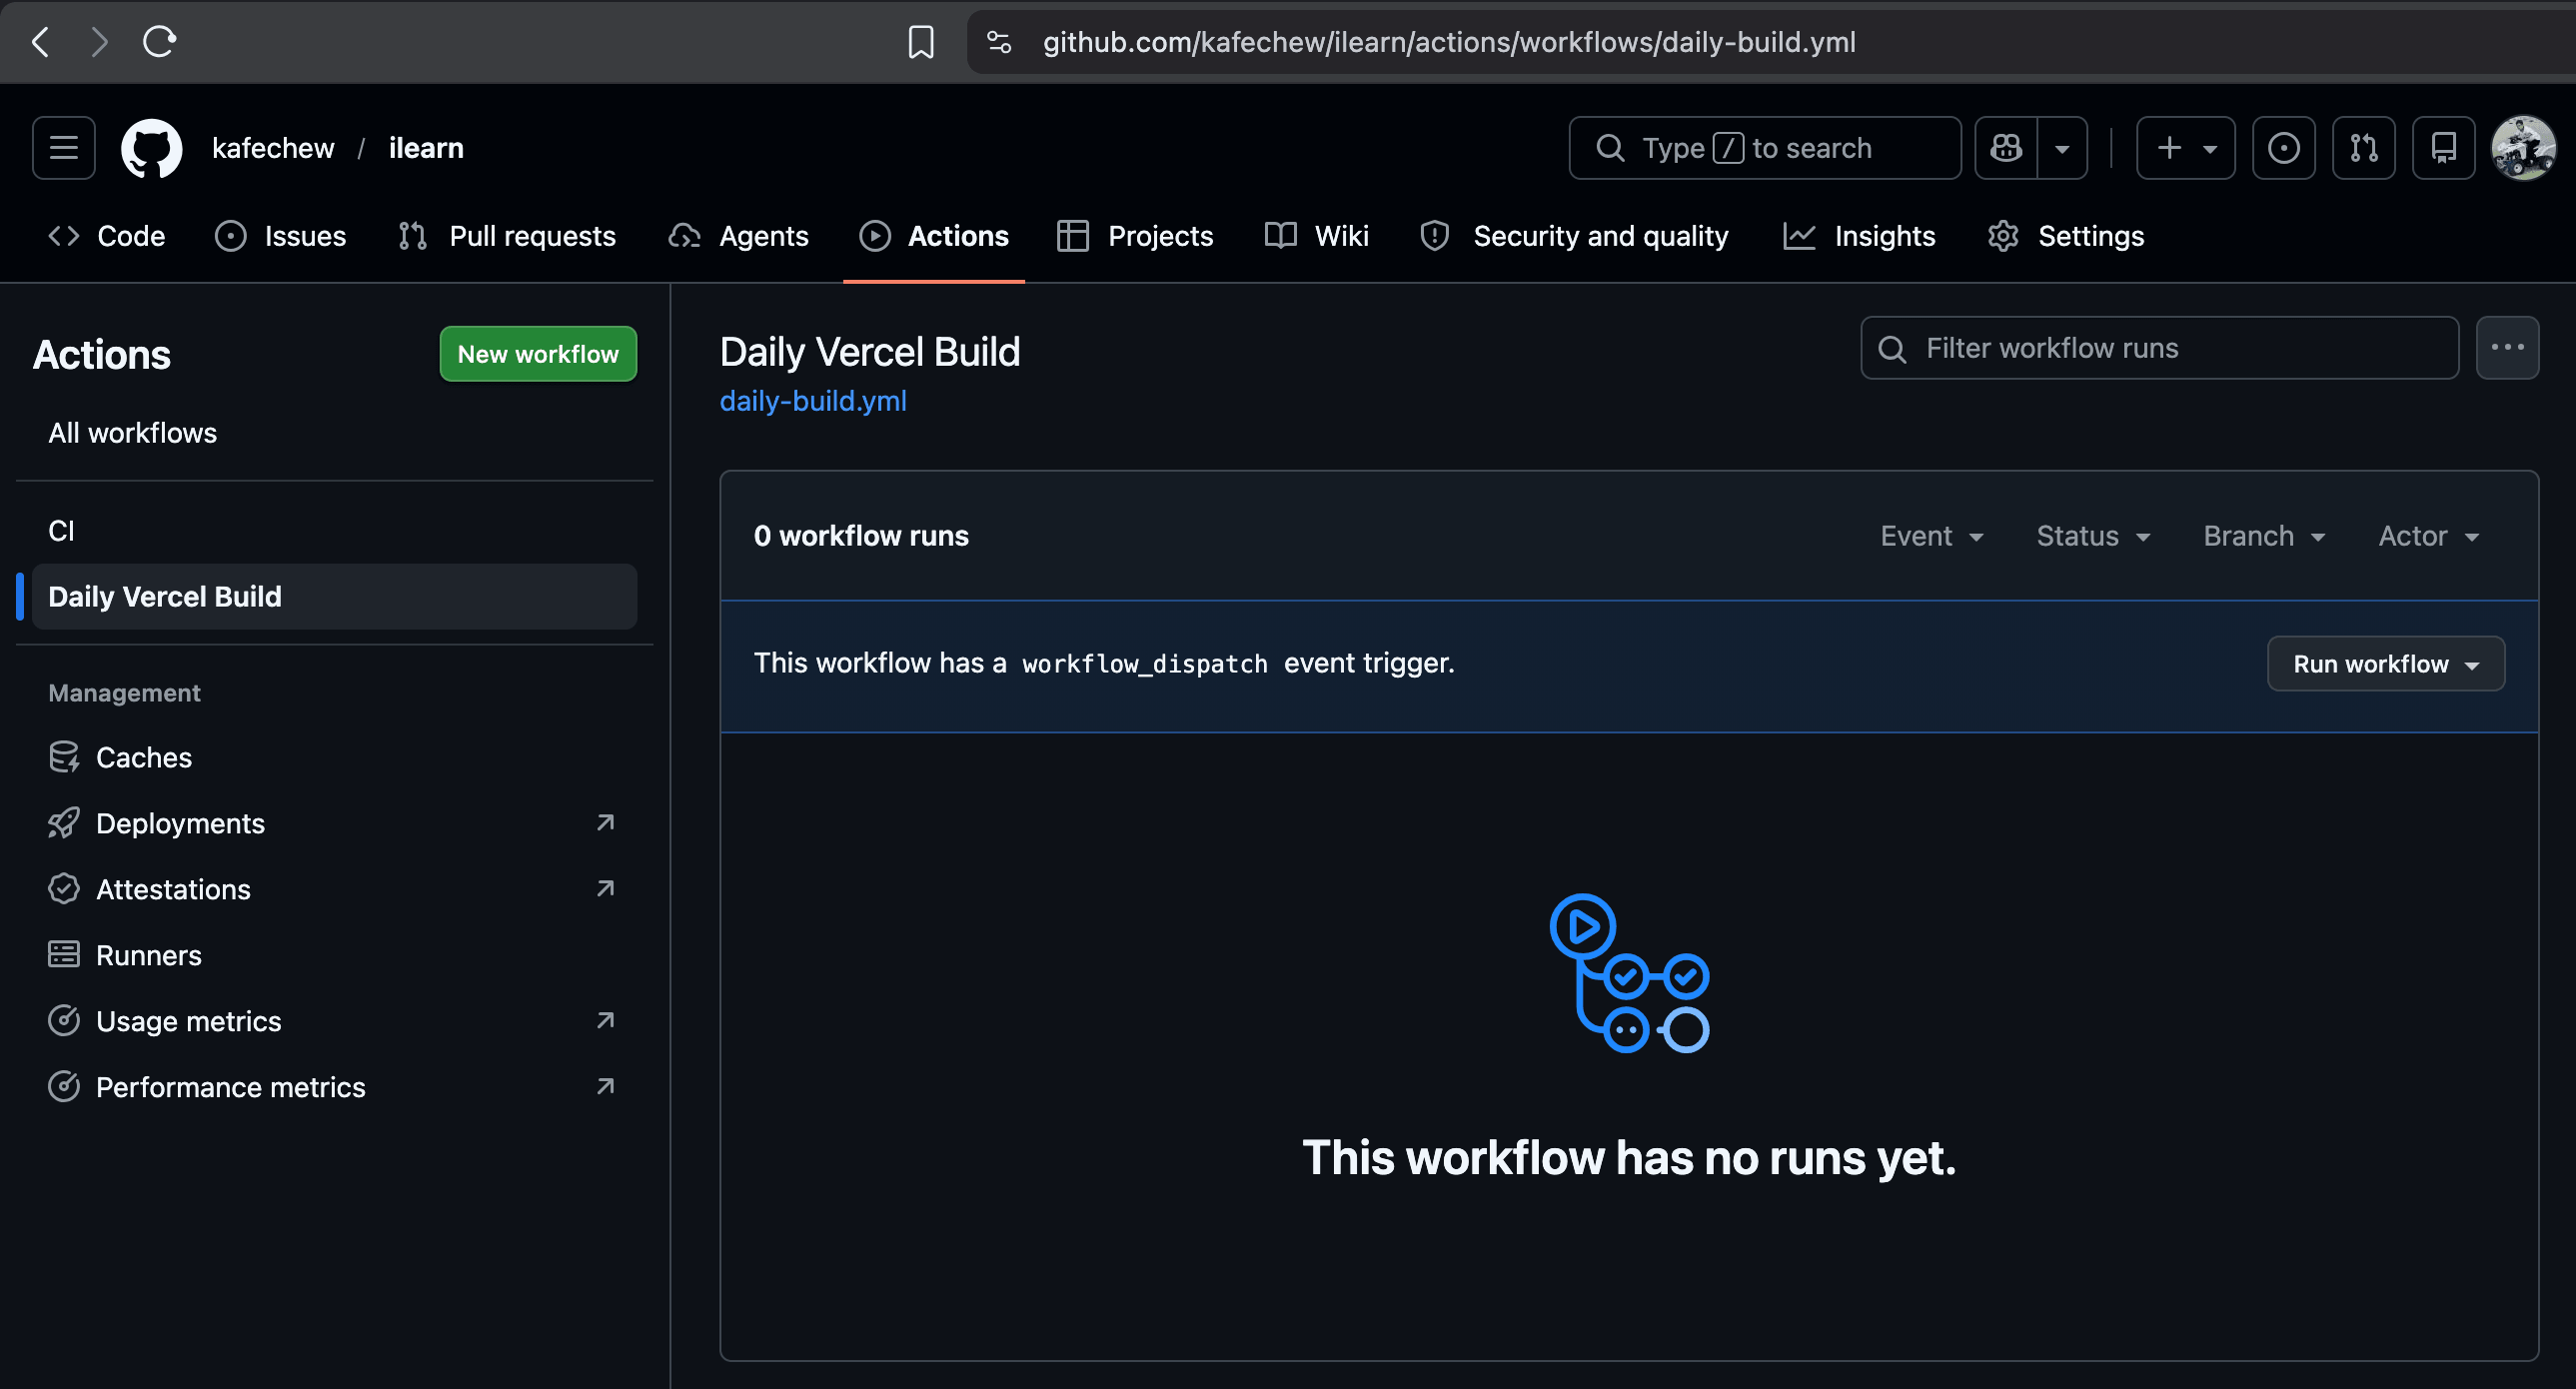
- Navigate to your repository on GitHub and click the Actions tab at the top.
- Under the left-hand menu, click on Daily Vercel Build Optimization.
- Look over to the right side of the screen; you will see a gray dropdown button labeled Run workflow. Click it, leave the branch as
main, and hit the green Run workflow button.
Give it a few seconds. The workflow will spin up, execute the curl post command, and turn green.
If you jump back over to your Vercel Dashboard, you should immediately see a fresh build tagged with “Deployment Hook” running on your project. Once that build completes, any post whose scheduled timestamp has expired will instantly go live on your site!
Optimizations and Pro-Tips for Long-Term Maintenance
Before leaving your pipeline on cruise control, keep these three evergreen optimization points in mind:
- Watch out for GitHub Action Delays: GitHub Actions cron schedules are treated as lower priority by GitHub. If you set your cron job for
0 0 * * *(8:00 AM local time), it might actually execute anywhere between 8:00 AM and 8:25 AM depending on overall GitHub server loads. If precise up-to-the-minute scheduling is critical for your content, don’t be alarmed if it runs a few minutes late. - Keep an eye on Vercel Build Minutes: Vercel’s free hobby tier includes 6,000 build minutes per month. A standard Astro build takes less than a minute. Running a daily scheduled build consumes roughly 30 build minutes a month—meaning this system is well within the free safety zone. However, avoid setting your cron job to run hourly (
0 * * * *), as that can quickly eat up your limits unnecessarily. - Combine with Local Automated Validations: If you want to ensure your scheduled markdown files don’t contain broken links or formatting bugs before they go live blindly, you can add an Astro linting step to this workflow file before triggering the Vercel webhook.
Final Thoughts
By combining Vercel’s modular deploy architecture with GitHub Actions’ free automation runners, we successfully replicated the best feature of a monolithic CMS like WordPress inside a lightning-fast, secure Jamstack environment.
You no longer have to manually open your laptop on vacation just to push a blog post live. Write your content in bulk, date them thoughtfully into the future, push them to your git repository, and let your automated stack do the heavy lifting for you.