After successfully setting up PopeBot on your Raspberry Pi, you might want to control it on the go. Setting up Telegram as an alternative access method is the perfect solution.
To do this, we need to configure two main things: a Telegram Bot Token (so your system can control the bot) and a Chat ID (so the bot knows who to listen to).
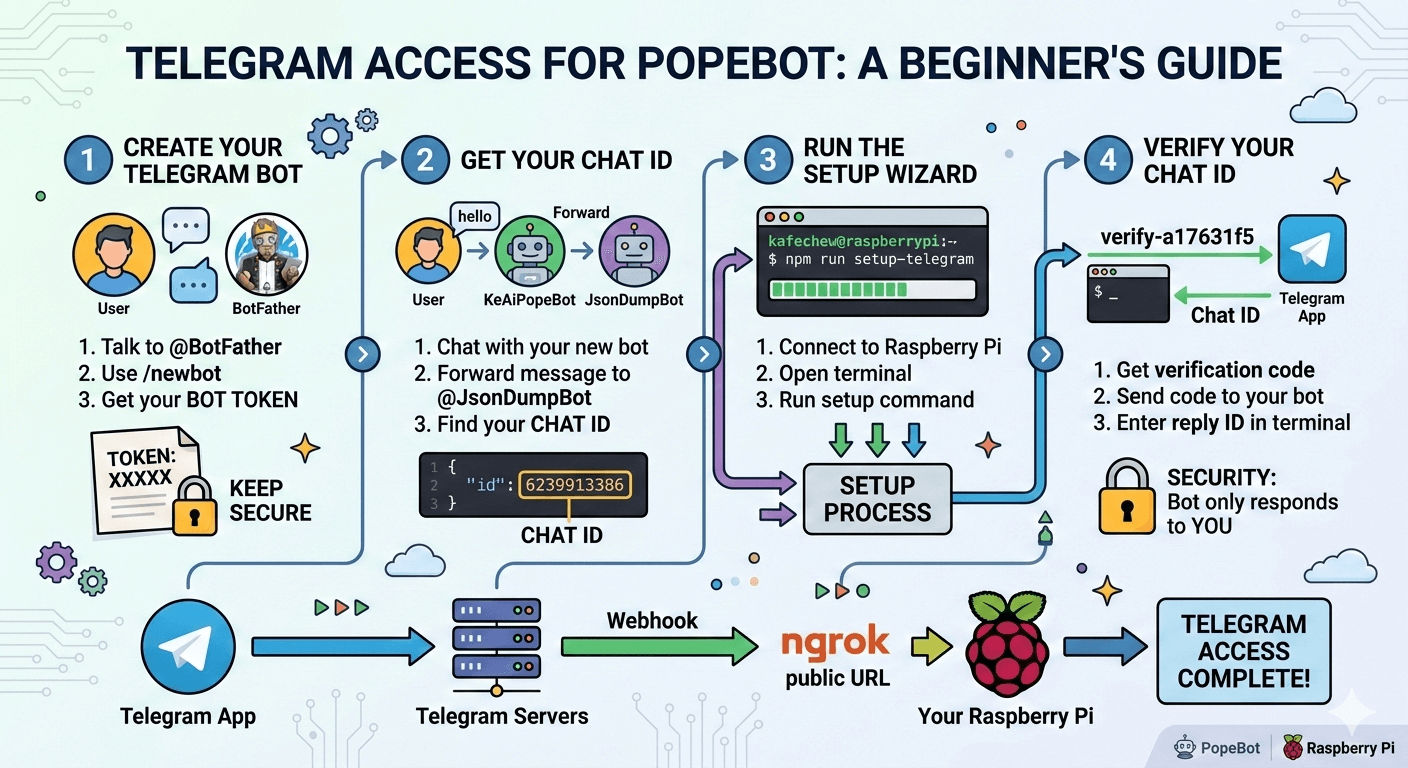
Understanding the flow: When you send a message in Telegram, Telegram sends a “webhook” to your public ngrok URL, which forwards the message to your Raspberry Pi.
Here is the step-by-step process to get it up and running.
Step 1: Create Your Telegram Bot
First, we need to officially create the bot on Telegram. Telegram has a special, official bot dedicated to creating other bots, called the BotFather.
- Open Telegram and search for
@BotFather(look for the verified blue checkmark). - Start a chat and type the command
/newbot. - Choose a Name: This is the display name. For example:
KeAi. - Choose a Username: This must be unique and end in “bot”. For example:
YourPopeBot.
Once successful, BotFather will give you a TELEGRAM_BOT_TOKEN. It will look something like this:
1234567890:ABCDefGhIJKlmNoPQRsTUVwxyZ
⚠️ Important: Treat this token like a password! Keep it secure, as anyone with this token can control your bot.
Step 2: Find Your Telegram Chat ID
Your bot needs to know exactly who it is allowed to talk to. For that, we need your personal Telegram Chat ID.
-
Start a conversation with your newly created bot (search for
@YourPopeBotand hit “Start”).Note: It won’t respond yet because it isn’t connected to your Raspberry Pi—that is completely normal!
-
Send a simple message like “Hello” to your bot.
-
Now, forward that “Hello” message to another bot called
@JsonDumpBot. -
The JsonDumpBot will reply with a large block of code. Don’t let this intimidate you! Look specifically for the
chatsection.
Here is an example of what it looks like:
{
  "message": {
    "chat": {
      "id": 6138813385,       <-- THIS IS YOUR CHAT ID
      "first_name": "Kheai",
      "username": "kafechew",
      "type": "private"
    }
  }
}
Write down that number (e.g., 6138813385). This is your TELEGRAM_CHAT_ID.
Step 3: Run the Telegram Setup Wizard
Now we need to tell your PopeBot on the Raspberry Pi about the Telegram bot you just created. We’ll do this using the built-in setup script.
Open your Raspberry Pi terminal and run:
npm run setup-telegramThe wizard will guide you through the configuration. Here is what to expect:
- App URL: Telegram needs a public web address to send messages to your bot. The script will detect your current public URL (like your
ngrokaddress:https://random-web-name.ngrok-free.dev). Confirm this is correct. - Bot Token: Paste the long token you got from the BotFather in Step 1.
- Webhook Registration: The script will automatically link your public URL to your Telegram bot.
Here is what your terminal will look like during this process:
◇  [2/6] App URL
●  Your bot needs a public HTTPS URL so Telegram can deliver messages to it via webhook.
◆  APP_URL: https://random-web-name.ngrok-free.dev

◇  [3/6] Telegram Bot Token
●  Your agent needs a Telegram bot token from @BotFather to send and receive messages.
◇  Telegram bot token: 1234567890:ABCDefGhIJKlmNoPQRsTUVwxyZ

◇  [4/6] Register Webhook
◆  Generated webhook secret
◇  Telegram webhook registered
Step 4: Verify Your Chat ID
Finally, the most important part: Security!
We want to make sure your PopeBot only answers you, and not the entire internet. This is called Chat ID Verification.
- When the terminal setup reaches Step 5, it will give you a special verification code like
verify-b27641f5. - Go back to your Telegram app and send that exact message to your bot (
@YourPopeBot). - Your bot will reply with your Chat ID. Paste that number back into the terminal and hit Enter!
Plaintext
◇  [5/6] Chat Verification
●  To lock the bot to your chat, send the verification code.
   Send this message to your bot: verify-b27641f5
   The bot will reply with your chat ID. Paste it below.

◇  Paste your chat ID from the bot (or press Enter to skip):
   6138813385

◆  Chat ID saved: 6138813385

└  Telegram setup complete!
Congratulations! You can now control your PopeBot directly from Telegram, making your Raspberry Pi accessible from anywhere.