For years, every Mac user trying to record a tutorial, a video stream, or gameplay ran into the same frustrating brick wall. You open QuickTime Player, hit record, finish your video, and realize there is absolutely zero internal sound.
If you look up how to fix it online, most old articles tell you to download virtual audio drivers like BlackHole or configure confusing Multi-Output settings inside your Mac’s Audio MIDI Setup. If that gets too annoying, people usually tell you to ditch QuickTime completely and install massive third-party apps like OBS Studio.
I tried all of that. I installed OBS, fought with black screen glitches, and messed with permissions. But then I looked closer at my Mac running macOS Tahoe v26.4.
I discovered that Apple finally fixed this issue natively! You do not need plugins, drivers, or OBS anymore. Here is the complete guide on why the “silent video” issue happens and how to record crystal-clear system audio using only your built-in Mac tools.
Why QuickTime Screen Recordings Used to Be Silent
By default, Apple designed QuickTime to only look at your external sound inputs (like your built-in microphone). It completely blocked internal sound capture. Apple did this for two major reasons:
- Copyright Privacy: To stop people from easily ripping movies or music from web browsers.
- System Safety: Older macOS versions lacked a safe way for an app to copy system audio without digging deep into the computer’s core system layer.
Because of this, QuickTime’s audio options would only show “None” or your physical microphone. If you wanted to record a game or a video clip, your microphone would only pick up the tinny sound leaking out of your laptop speakers.
The Modern Solution: macOS Tahoe’s New Audio Permissions
If you are running a modern operating system like macOS Tahoe, Apple has introduced a dedicated security section called Screen & System Audio Recording. This changes everything.
Your Mac can now split your audio streams natively. It lets apps safely pull internal audio directly from your system without needing a virtual fake microphone.
Step 1: Check Your Privacy Settings
Before opening QuickTime, you need to make sure your system permissions are active:
- Click the Apple logo in the top-left corner and open System Settings.
- Click on Privacy & Security in the left sidebar.
- Scroll down and click on Screen & System Audio Recording.
- Make sure the toggle switch next to QuickTime Player is flipped ON.
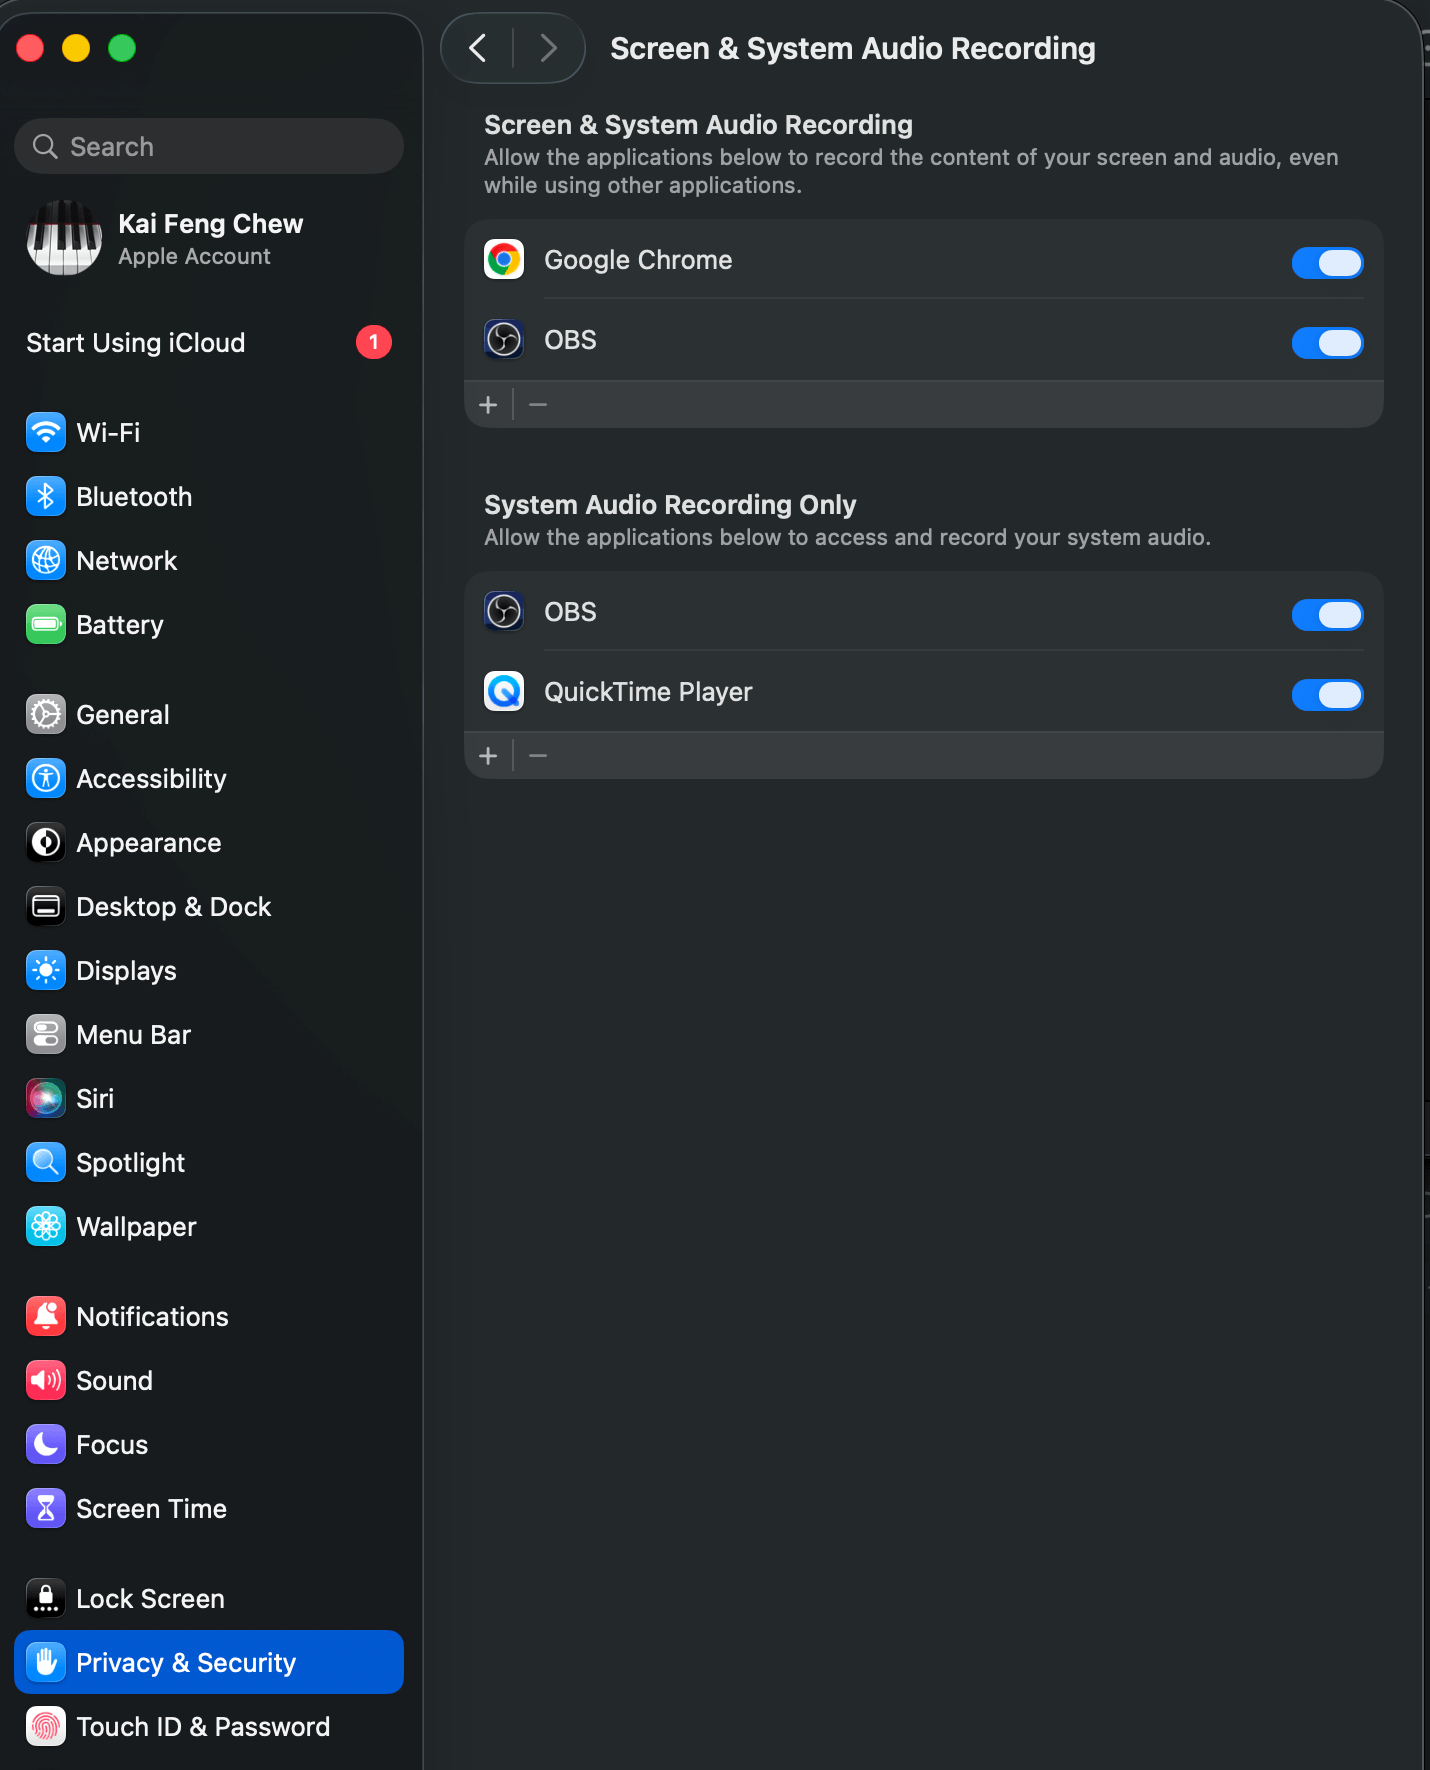
(Note: If you ever see a completely black screen or get silent videos, coming back here to toggle this switch OFF and then ON again resets the security layer and fixes the glitch!)
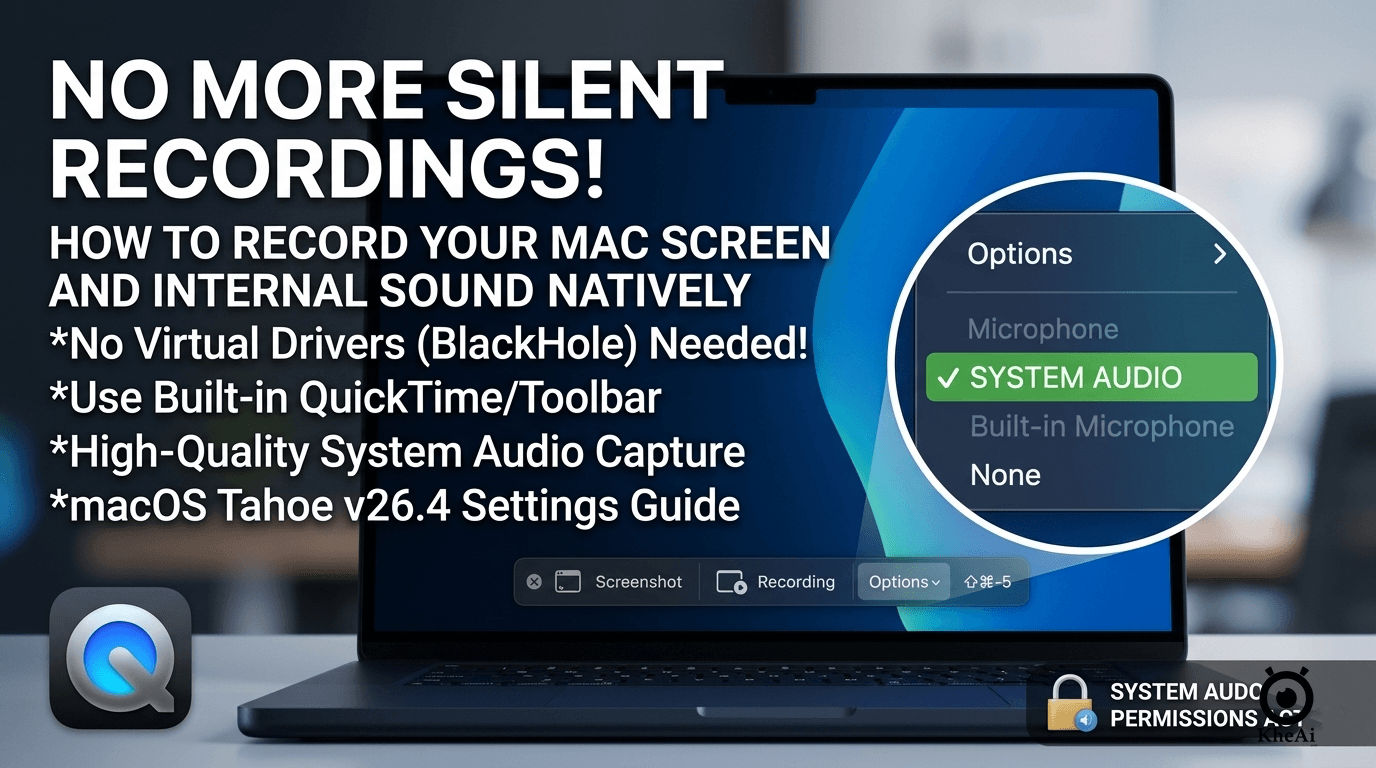
[System Settings] ──► [Privacy & Security] ──► [Screen & System Audio Recording] ──► Toggle ONStep 2: Configure QuickTime for System Audio
Now that your Mac allows system audio capture, you just have to tell QuickTime to use it.
- Press Shift + Command + 5 on your keyboard to instantly pull up the built-in Mac Screenshot and Recording toolbar.
- Click the Options button on the floating menu.
- Look at the Microphone list.
- Select System Audio (or your Mac’s internal audio channel) instead of your regular microphone.
- Choose your recording size: Click Record Entire Screen or choose the new macOS Tahoe Record Selected Window feature to capture just one app.
- Hit Record.
When you hit stop, your saved video file will have perfect, high-quality digital internal sound. No echoing, no background noise, and no extra apps clogging your disk space.
Direct Comparison: Built-In Tools vs. Old Workarounds
To see why this native update is such a game-changer, look at how the built-in tool stacks up against the old methods we used to rely on:
| Feature | Native Toolbar (Shift+Cmd+5) | OBS Studio Setup | Virtual Driver (BlackHole) |
|---|---|---|---|
| Setup Time | Instant (Built-in) | 10–15 minutes | 15–20 minutes |
| System Impact | Extremely lightweight | Heavy CPU usage | Modifies audio paths |
| Extra Software | None required | Requires OBS Studio | Requires external package |
| Audio Routing | Automatic | Automatic via Kit | Manual via MIDI Setup |
| Best Used For | Quick captures & tutorials | Pro streaming & overlays | Advanced audio mixing |
Pro Tips for Clean Mac Screen Recordings
Now that your audio is working, use these built-in settings to make your screen recordings look much cleaner and more professional:
- Highlight Your Actions: In the Options menu of the recording toolbar, turn on Show Mouse Clicks. This adds a temporary black ring around your cursor whenever you click, making it incredibly easy for viewers to follow your tutorials.
- Save Space with the Right Format: If you are using macOS Tahoe on an Apple Silicon Mac, look under Options for the Capture Format setting. Choosing SDR (Most Compatible) saves your video as a standard H.264 MP4 file that plays perfectly anywhere. Choosing HDR saves it in high dynamic range using HEVC, which looks stunning but creates much larger files.
- Use the Quick Stop Shortcut: Instead of moving your mouse all the way to the top menu bar to click the stop icon, simply press Command + Control + Escape to instantly stop recording and save your video.