To build a “Sovereign Oracle”—an AI that owns its intelligence—we need a storage layer that is as flexible as the human mind and as persistent as a blockchain.
When dealing with Nostr relays, we are essentially drinking from a firehose of JSON data. Traditional SQL databases would choke on this variety. MongoDB is our choice because it speaks JSON natively. Below is the blueprint for setting up your permanent intelligence layer using MongoDB Atlas.
1. Why MongoDB for an AI MVP?
Before we click buttons, let’s talk strategy. Why are we here?
- JSON-Native: Nostr events and AI outputs are document-based. MongoDB stores them “as-is.”
- Meteor Integration: Meteor.js and MongoDB are a “married” tech stack; they sync data in real-time right out of the box.
- Scalability: We start on the free tier (Atlas), but the logic remains the same whether we’re on AWS or a Raspberry Pi at the edge.
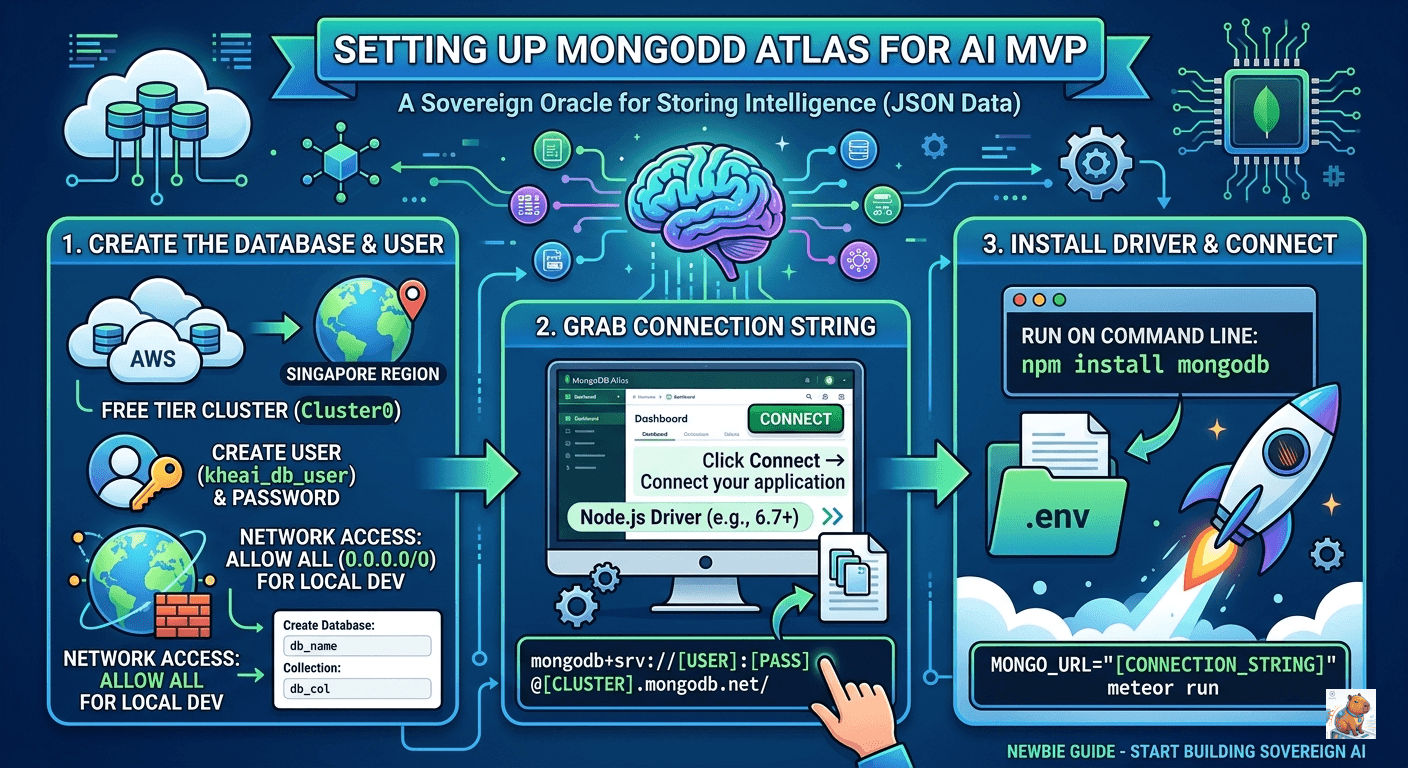
2. Provisioning Your Cloud Cluster
We’ll use MongoDB Atlas to get off the ground quickly.
- Deploy a Free Tier:
- Head to MongoDB Atlas.
- Cluster Name:
Cluster0(Standard for MVPs). - Cloud Provider:
AWS. - Region:
Singapore (ap-southeast-1)(Choose the region closest to your users or your server for lowest latency).
- Create Your Database User:
- Username:
kheai_db_user - Password: Use a strong, generated string. Avoid special characters like
@or:inside the password, as they can break the connection URI.
- Username:
- Network Access (The “Gatekeeper”):
- During development, go to Network Access > Add IP Address.
- Select Allow Access From Anywhere (
0.0.0.0/0). - Warning: This is for the MVP phase. Once you go live, restrict this to your server’s specific IP address.
3. Mastering the Connection String
This is where most newbies get tripped up. There are two “formats” for connection strings. You will likely see both in your journey, but one is superior.
The Modern SRV Format (Recommended)
This is the clean, short version. Use this for Node.js 3.6+ and modern Meteor setups.
mongodb+srv://kheai_db_user:YOUR_PASSWORD@cluster0.xnv0qyc.mongodb.net/db_name?retryWrites=true&w=majorityThe Sharded/Legacy Format
If you see a long string with shard-00-00 and port 27017, you are looking at the legacy connection string. Atlas sometimes provides this for older drivers.
Skeptical Check: If your app supports it, always use the SRV format. It’s easier to manage and handles DNS seeds automatically.
4. Integration: Connecting the Pipes
For Standard Node.js Apps
If you are running a standalone script to ingest Nostr data, you’ll need the driver:
npm install mongodbFor Meteor.js
Meteor doesn’t need a separate driver install for the core database; it just needs an environment variable. When you run your app locally but want to use the cloud database, use the MONGO_URL prefix:
The Local Run Command:
MONGO_URL="mongodb+srv://kheai_db_user:YOUR_PASSWORD@cluster0.xnv0qyc.mongodb.net/db_name" meteor runThe Production Deployment (mup):
If you are using meteor-up (mup), your settings.json or mup.js will look like this:
env: {
  MONGO_URL: "mongodb+srv://kheai_db_user:XXXXXX@cluster0.mongodb.net/db_name?retryWrites=true&w=majority",
  // Optional: If you use a separate DB for your Oplog (scaling)
  MONGO_OPLOG_URL: "mongodb://..."
}
5. Summary Table for Quick Reference
| Component | Setting | Notes |
|---|---|---|
| Database Name | db_name | Rename this to kheai_prod or kheai_dev. |
| Collection | db_col | Think of this as a “Table” (e.g., intelligence_logs). |
| Port | 27017 | Standard Mongo port (Hidden in SRV strings). |
| Auth Source | admin | Usually required in legacy strings to verify the user. |
Pro-Tips for the Sovereign Developer
- The
.envRule: Never, ever hardcode your connection string in your main app file. Use a.envfile and add it to your.gitignore. - Naming Matters: Don’t just stay with
Cluster0anddb_name. As you scale, having a database namedkheai_mainand collections likenostr_eventsandai_responseswill save your sanity. - Local Fallback: If you’re traveling or have bad internet, install MongoDB locally via Docker or Homebrew. You can swap your
MONGO_URLtomongodb://127.0.0.1:27017/kheaiand work offline.