Let’s be completely real for a second: transitioning into a “Prize Hunter” for online coding challenges—like the legendary Dev.to sponsor hackathons—is less like a cozy 9-to-5 and more like professional poker. It’s high-risk, high-reward, and operates entirely on a binary outcome. You can spend 50 hours building an incredible integration and walk away with $0 if you don’t place.
But if you approach it strategically, it is one of the most explosive ways to learn modern stacks, build a bulletproof portfolio, and bootstrap your own projects without giving away equity.
I’ve learned that winning a developer challenge—whether on DEV.to or any major hackathon platform— isn’t about having ten years of senior engineering experience. You cannot just throw a wrapper over an API, cross your fingers, and hope the judges see your genius. Winning is engineered. It requires reverse-engineering the judging criteria, mitigating local hardware friction, and architecting a solution that is technically sound and visually undeniable. It’s about how effectively you can orchestrate AI to do the heavy lifting, how creatively you use sponsor APIs, and how well you tell your story.
If you are a total newbie wanting to go from zero to hero, here is my evergreen, step-by-step blueprint for taking any hackathon idea from absolute zero to a deployed, prize-winning reality, using a completely free, AI-powered toolkit. A specific case study? You can refer Dev.to April Fools Hackathon and EarthDay Weekend Hackathon.
The Mindset of a Prize Hunter
Before we touch the code, you need to understand the “meta” of Dev.to challenges. These are not algorithmic LeetCode tests. They are product and marketing challenges disguised as coding competitions.
- The Integration Bias: If a company like Google Cloud, MongoDB, or Appwrite is sponsoring the challenge, your core mission is to find a deep, creative, and highly documented use case for their specific API.
- The Blog Factor: You aren’t just a coder; you are a technical writer. The judges heavily weigh your project documentation, Developer Experience (DX), and the narrative of your submission post.
- The Hybrid Strategy: Protect yourself from burnout. If you don’t win the cash, make sure you own the code. Use your hackathon projects to build a portfolio for consulting, or double-dip by submitting the same open-source codebase to multiple bounty programs.
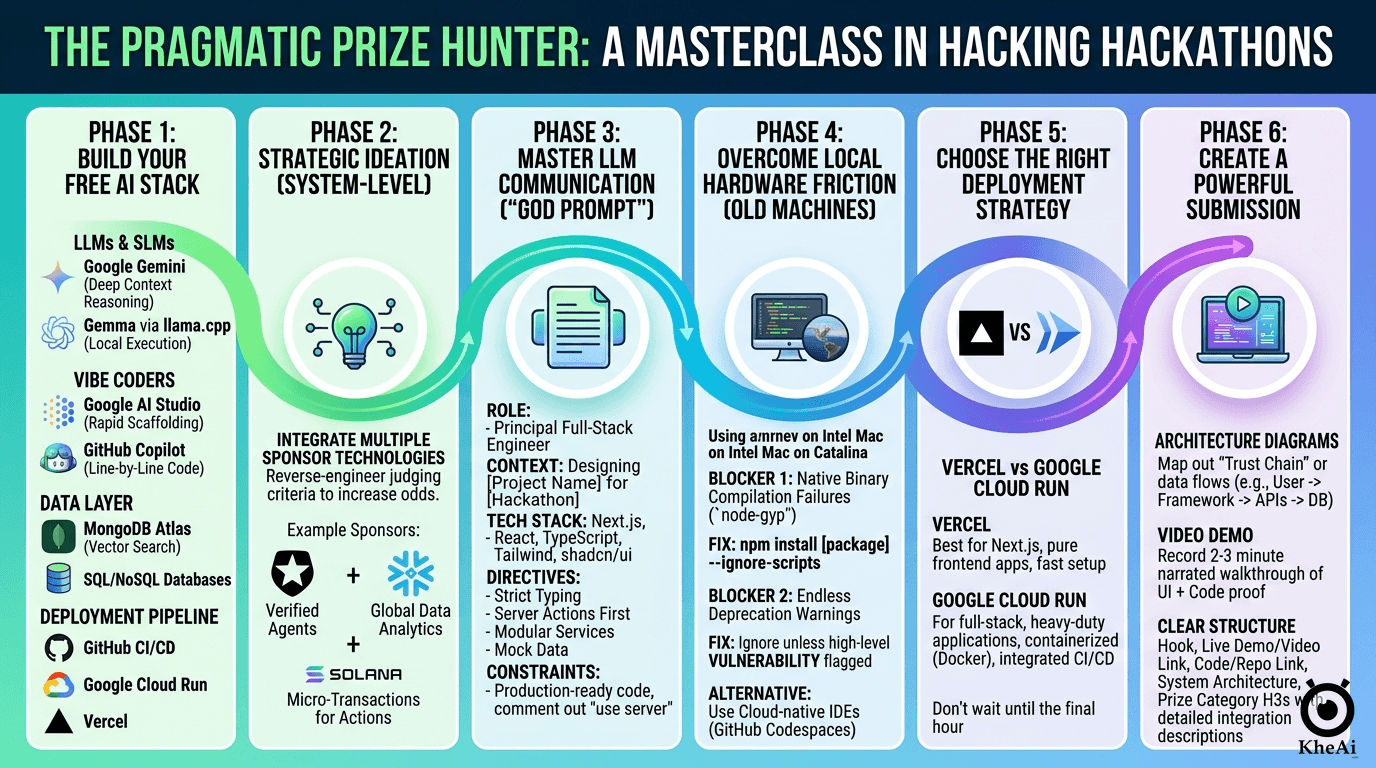
Phase 1: Arming Yourself with the Ultimate Free AI Stack
Before you ideate, you need a friction-free environment. I don’t pay for bloat; I rely on highly optimized, predominantly free tools to move fast. Building a modular stack allows you to swap components based on the specific challenge sponsors.
- The Brains (LLMs & SLMs): Use Google Gemini or ChatGPT for deep context reasoning, architecture planning, and multimodal tasks. If you need local execution without relying on cloud APIs, run Small Language Models (SLMs) like Gemma via a
llama.cppserver optimized with TurboQuant in Raspberry Pi. For Cloud APIs, most probably we will rely ongemini-3.1-flash-lite-previewfor its generous rate limits and speed. - The Vibe Coders: For rapid zero-to-one scaffolding, use web-based builders like Google AI Studio. For granular, line-by-line execution inside your IDE, lean on GitHub Copilot. Alternatively, you can use the free tiers of web AI apps (Gemini, ChatGPT, Claude) to map out your logic.
- The Data Layer: Rely on MongoDB Atlas (specifically utilizing Vector Search for AI-driven semantic retrieval) and traditional SQL/NoSQL databases as dictated by the prompt, as well as an LLM Wiki for knowledge grounding.
- The Deployment Pipeline: GitHub for version control, connected to Google Cloud Run (for containerized full-stack apps) or Vercel (for frontend-heavy frameworks) for seamless CI/CD.
Phase 2: Strategic Ideation (The “System-Level” Approach)
The biggest mistake developers make is focusing on a single technology and ignoring the rest of the ecosystem. Grand-prize judges look for a holistic vision. Since prize category winners are drawn from a smaller pool of submissions, integrating multiple sponsor technologies drastically increases your odds of winning.
When the theme drops, do not ask your LLM for “app ideas.” Ask it for “system architectures.”
If you had done a similar project, you can ask the AI to get inspiration and enhance into a winning idea for a specific DEV Challenge.
The Ideation Prompt Strategy:
Feed the exact hackathon rules, themes, and all available sponsor tech into your LLM. Ask it:
I am entering the [Dev Challenge URL].

Give me 10 highly interactive architectures that meaningfully incorporate at least three of these sponsor technologies [List them: Auth0, Snowflake, Solana, etc.] to solve a problem related to [Theme]. Justify how each technology acts as a load-bearing pillar in the system, not just a wrapper.

Optionally, getting inspiration from this [Previous Project URL] and enhance into a winning idea too.
For example, if the sponsors are an Auth provider, a Data Lake, and a Blockchain, your system could be: Auth handles edge-device verification, the Data Lake aggregates global analytics, and the Blockchain issues micro-rewards for user participation.
Phase 3: The Art of LLM Communication & “Vibe Coding”
Once your idea / architecture is locked, you move to rapid prototyping. This is where you write a “God Prompt.” You must establish strict technical constraints and step-by-step tasks so the LLM doesn’t output generic, outdated tutorials.
The Anatomy of a God Prompt:
**ROLE & CONTEXT**

You are a Principal Full-Stack Engineer. We are building [Project Name] for a hackathon. The platform solves [Problem] by integrating [Sponsor Tech A] and [Sponsor Tech B].

**TECH STACK & ARCHITECTURE**

- **Framework:** Next.js (App Router), React, TypeScript.
- **Styling:** Tailwind CSS, shadcn/ui.
- **Integrations:** [List specific SDKs, e.g., Auth0, Solana Web3.js].

**PROJECT DIRECTIVES**

1. **Strict TypeScript:** Enforce strict typing for all API responses.
2. **Server Actions First:** Keep heavy logic and API keys securely on the server side using Next.js Server Actions.
3. **Modular Integrations:** Create a dedicated `/services` directory with separate, highly documented files for each technology.
4. **Mock Data:** Generate robust mock data generators for any hardware or complex backends we cannot immediately connect.

**EXECUTION TASKS (Step-by-Step)**

**Step 1:** Output the ideal directory tree.

**Step 2:** Write boilerplate integration code for the `/services` files.

**Step 3:** Build the main `app/page.tsx` dashboard UI.

**CONSTRAINTS**

Do not explain basic concepts. Give me production-ready, highly commented code that I can copy, paste, and run.
Pro-Tip: Cloud AI coders often fail to process "use server"; directives during generation. Comment them out in its response, and manually uncomment them when you move the code to your local machine.
// "use server";

// Initialize the Gemini client securely.
// Uses GEMINI_API_KEY for standard deployments, falling back to NEXT_PUBLIC_GEMINI_API_KEY.
const apiKey = process.env.GEMINI_API_KEY || process.env.NEXT_PUBLIC_GEMINI_API_KEY;
const ai = new GoogleGenAI({ apiKey });
Phase 4: Test Locally
Clean Up: Remove all AI-generated boilerplate comments (especially Studio wordings), remove .git from downloaded AI studio zips, initialize a fresh repository, and ensure your .env variables are correctly mapped.
- Install dependencies:
npm install - Create a
.envfile in the project root (copy from.env.example) - add
GEMINI_API_KEY="your_actual_gemini_api_key_here" - Start the development server:
npm run dev - Navigate to http://localhost:3000 in your browser
- Use Github Desktop to create a new repo via
existing repo - Use free Github CoPilot (via VS Code) for update code locally
Overcoming Friction (The Old Machine Survival Guide)
If you are developing on older hardware (like an Intel MacBook running macOS Catalina), you will inevitably hit legacy build walls when pulling down massive modern SDKs. I research every error meticulously rather than blindly copy-pasting fixes.
Here is how to bypass the two most common local friction points:
🛑 Blocker 1: Native Binary Compilation Failures (node-gyp)
The Symptom: You run npm install and the terminal freezes, throwing walls of red text mentioning gyp ERR! build error or failures building aws-crt or bcrypt.
The Root Cause: Enterprise SDKs often rely on highly optimized C++ native add-ons. Node.js triggers node-gyp to compile these locally. Older operating systems have outdated Xcode command-line tools or incompatible Python 3 aliases, causing the C++ compiler to crash violently.
The Fix: Bypass the native compilation entirely.
npm install [package-name] --ignore-scriptsThis strictly pulls down the JavaScript code but skips running pre-install or post-install build scripts. While you lose minor C++ optimizations, the core SDK functions perfectly, allowing you to keep building.
🛑 Blocker 2: Endless Deprecation Warnings
The Symptom: Warnings like npm warn deprecated glob@10.5.0 flood your terminal during installation.
The Root Cause: Massive SDKs pull in thousands of sub-dependencies. Often, these tools rely on older utility packages that the original authors have marked as deprecated.
The Fix: Ignore them. In a fast-paced weekend build, these warnings will not break your application logic. Unless NPM explicitly flags a VULNERABILITY, keep your momentum moving forward.
Alternative Strategy: If local compilation is entirely broken, abandon local setup and use cloud-native IDEs (like GitHub Codespaces or Google AI Studio Build). The heavy lifting of dependency resolution happens on remote Linux containers instead of your aging CPU.
Phase 5: Deployment Strategies
A hackathon project isn’t real until it’s live on the internet. Never wait until the final hour of the hackathon to deploy. Localhost works until it doesn’t. Because we built a Next.js application, it is highly portable. Since we are targeting the “Best Google AI/Cloud Usage” category, deploying to Google Cloud Run is our gold standard.
Step 1: Prepare your Next.js App for Docker
Next.js needs to create a “standalone” build—a tiny version of your app including only production files.
Update next.config.js:
/** @type {import('next').NextConfig} */
const nextConfig = {
  output: 'standalone', // Required for Docker
};
module.exports = nextConfig;
Create a .dockerignore file:
node_modules
.next
.git
Create a Dockerfile:
Use this optimized multi-stage template in your root directory:
FROM node:20-alpine AS base

# 1. Install dependencies
FROM base AS deps
RUN apk add --no-cache libc6-compat
WORKDIR /app
COPY package.json package-lock.json* ./
RUN npm ci

# 2. Build the app
FROM base AS builder
WORKDIR /app
COPY --from=deps /app/node_modules ./node_modules
COPY . .
RUN mkdir -p public
ENV NEXT_TELEMETRY_DISABLED 1
RUN npm run build

# 3. Production runner
FROM base AS runner
WORKDIR /app
ENV NODE_ENV production
ENV NEXT_TELEMETRY_DISABLED 1

RUN addgroup --system --gid 1001 nodejs
RUN adduser --system --uid 1001 nextjs

COPY --from=builder /app/public ./public
COPY --from=builder --chown=nextjs:nodejs /app/.next/standalone ./
COPY --from=builder --chown=nextjs:nodejs /app/.next/static ./.next/static

USER nextjs
EXPOSE 3000
ENV PORT 3000
ENV HOSTNAME "0.0.0.0"

CMD ["node", "server.js"]
Step 2: Push & Deploy to Cloud Run
-
Push your code to a public GitHub repository (a strict requirement for Dev.to challenges).
-
Go to the Google Cloud Console, create a project, and ensure Billing, Cloud Run, Cloud Build, and Artifact Registry are enabled.
-
Search for Cloud Run and click Create Service.
-
Choose Continuously deploy new revisions from a source repository. Setup Cloud Build.
-
Connect your GitHub and select your repository. Select Dockerfile as your build configuration.
-
The Free-Tier Secret Settings:
- Region:
us-central1,us-east1, orus-west1. - Authentication: Allow unauthenticated invocations (makes it public).
- CPU Allocation: CPU is only allocated during request processing.
- Autoscaling: Min instances
0. Max instances1. (Setting minimum instances to 0 ensures you stay in the free tier, though it results in a slight “cold start” delay for the first visitor). - Container Port: Change to
3000.
- Region:
-
Under “Variables & Secrets”, add your
GEMINI_API_KEY. Click Create!
Alternative Deployments:
- Vercel/Netlify: If you don’t want to deal with Docker, simply log into Vercel, import your GitHub repo, add your API key to the environment variables, and hit deploy.
- Quick Share: If you are just testing, Google AI Studio allows you to click “Share” directly from the browser IDE. However, avoid this for final submissions as the container sleeps frequently and you don’t control the API quotas. Settings > Integrations, get Shared URL.
Phase 6: Media, Assets, and The Perfect Submission
Your code could be flawless, but if your submission post is an unreadable wall of text, the judges will gloss over it. You have to sell the engineering.
1. Architecture Diagrams
Do not skip this. Use tools like Excalidraw or Eraser.io to map out your “Trust Chain” or data flow. Showing a visual map of how Data flows from a User → Framework → Sponsor API → Database proves you understand system design.
2. The Video Demo
Record a clean, 2-to-3 minute screen recording using QuickTime. Do not just click around silently. Narrate your process. Show the UI, then cut to the codebase to prove it is actually functioning and not just a Figma mockup. Upload this to YouTube and embed it at the top of your post.
3. The Images
-
Screenshots the live demo, platform dashboards and coding progresses.
-
AI
-
Generate with Gemini Banana Pro
Please generate an infographics in full 100% english & landscape mode. Compact but don't be too concise. -
Manually edit (remove watermark, add logo…)
-
reduce size with TinyJPG.com
-
Upload to ImageKit or Dropbox
-
Copy URL, e.g. https://ik.imagekit.io/moopt/kheai/popebot/ai-infra_jhV4Q9G5q.png
-
Edit blog at Typora
- Publish manually (or to Astro-Paper via Sublime Text )
-
4. The Submission Structure
Use this exact hierarchy to make grading easy for the judges:
- The Hook (What I Built): A one-sentence pitch connecting your project directly to the hackathon theme.
- Live Demo & Video: Embed the YouTube video and place the live deployment link right beneath it.
- Code: Embed the GitHub repository.
- System Architecture (How I Built It): Insert your diagram here. Explain the technical decisions and the why behind your stack.
- Prize Categories: Create distinct
###headers for every single category you are targeting. Explicitly write a brief paragraph under each explaining exactly how you integrated their technology. Force the judges to check the box next to your name.
Draft Submission Post with LLM
Based on all the discussions above (seriously everything!),

Please help me to fact check any mistakes / typos, enhance, reorganize, cleanup, streamline (step-by-step), deduplicate, expand (don't be too concise)...

turn into a very detailed, impactful & winning submission post using the template below:
Template
*This is a submission for [Weekend Challenge: Earth Day Edition](https://dev.to/challenges/weekend-2026-04-16)*

## What I Built
<!-- Tell us about your project! What does it do and what was your intended goal? -->

## Demo
<!-- Embed your project (i.e. Cloud Run) or share a deployed link/video demo of your project -->

{% embed https://www.youtube.com/watch?v=KRRVlbC0pAs %}

Live Demo: https://gheia-750841821481.us-central1.run.app/

## Code
<!-- Show us the code! You can embed a GitHub repo directly into your post. -->

{% embed https://github.com/kheai/gheia %}

## How I Built It
<!-- Walk us through your technical approach and any interesting decisions you made along the way. If you used any of the prize category technologies, be sure to highlight how you incorporated them here! -->

## Prize Categories
<!-- Note which ones apply and why (Best Use of Auth0 for Agents, Best Use of Google Gemini, Best Use of Snowflake, Best Use of GitHub Copilot, Best Use of Solana). -->

<!-- Team Submissions: @kheai @yeemun122 -->
Final Takeaway
Hackathons are a test of endurance, research, and technical strategy. By planning your architecture around the prize categories, writing rigorous prompts, and preparing for local environment failures, you remove luck from the equation.
Treat your first few hackathons as paid training. You are learning how to set up CI/CD pipelines, orchestrate AI agents, manage deployments, and write persuasive technical copy. Even if you don’t take home the cash prize on your first try, you are building a repository of deployable code and practical skills that traditional tutorials simply cannot teach. Focus on execution, double-check your implementations, and go build something undeniable.